Drift Detection
AWS CloudFormation allows you to detect if configuration changes were made to your stack resources outside of CloudFormation via the AWS Management Console, CLI, and SDKs. Drift is the difference between the expected configuration values of stack resources defined in CloudFormation templates and the actual configuration values of these resources in the corresponding CloudFormation stacks. This allows you to better manage your CloudFormation stacks and ensure consistency in your resource configurations. For more information on Drift detection, visit the AWS Blog.
In this lab, you will create a CloudFormation stack and purposefully make changes to its resources via other AWS Consoles, so that different types of changes can be visualized using the Drift Detection feature.
Note - This lab requires you to be in the N.Virginia (us-east-1) region.
Create a stack and check for drift
- Download the CloudFormation template from this link:
File name Purpose Download my_cfn_stack.ymlCreates the CloudFormation stack Download the template - Log in to your AWS account, select the N. Virginia region, and go to the CloudFormation console.
- Click Create Stack.
- Select Upload a template to Amazon S3 and upload the template you just downloaded and then click Next.
- Give the stack a unique name (such as
drift-lab-with-sqs) and click Next. - Leave the options on the next page (parameters, IAM role, etc.) blank and click Next.
- Review the details of your stack and click Create.
- Wait for the stack to complete creation (it might take a few minutes). When complete, the Drift status column will show NOT_CHECKED.
- Select
drift-lab-with-sqson the CloudFormation Stacks view, click Stack actions and Detect drift. - In a few moments refresh the page. You should see that the stack is now shown as IN_SYNC.

At this point the stack is in the expected Drift state, which is IN_SYNC. You will now simulate a situation that causes the template’s definition of resources to diverge from their actual live state, by making changes outside of the CloudFormation Console.
Modifying resources
- Go to the Simple Queue Service Console.
- Find the DriftLab-InputQueue, select it, and on Queue Actions, click Configure Queue.
- Make the following changes to the queue:
- Set Default Visibility Timeout to 50.
- Set Delivery Delay to 120.
- Click Save Changes.
You have now made a change in the value of an existing property, added a new property, and deleted an existing property of the InputQueue resource.
- Go to the CloudFormation Console.
- Select
drift-lab-with-sqson the CloudFormation Stacks view, click Stack actions and then click Detect drift. - When complete, this time the pagw will show the status as DRIFTED.
- View the details of what changed by clicking Stack actions again and then View drift results.
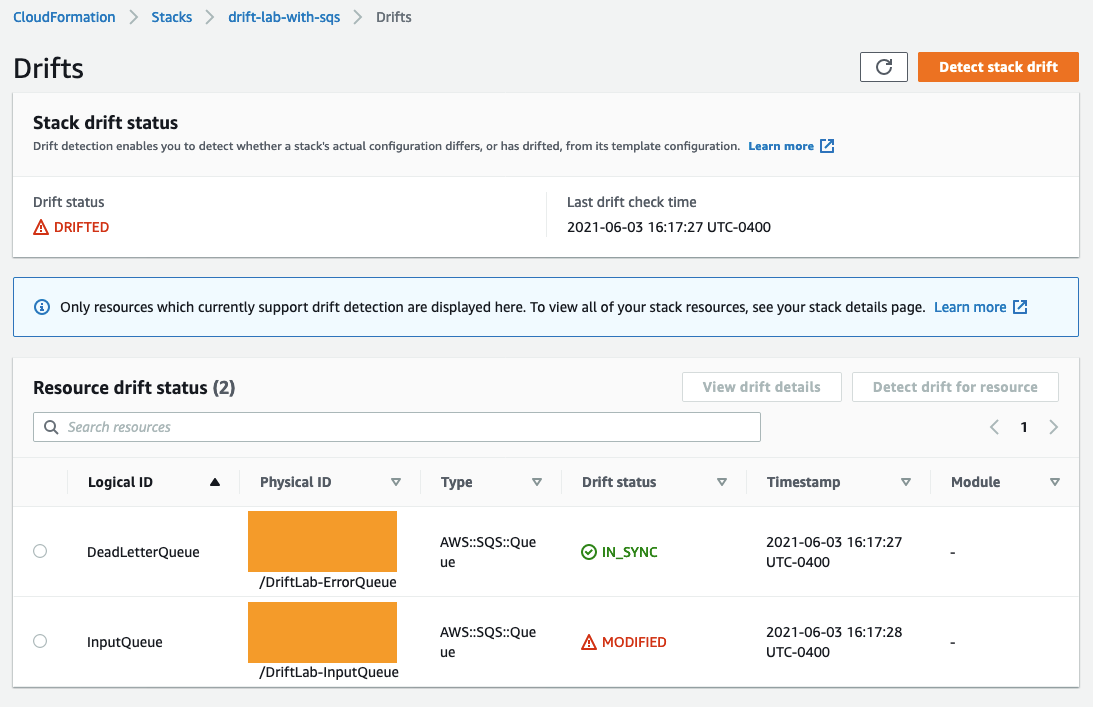
- Select the radio button next to the drifted SQS queue, and then click View drift details. You should see results like this:

Remediating by changing resources
TODO I stopped here
One option to recover a stack from a DRIFTED state is modifying its resources to revert their properties to the values specified in the stack’s template. This will bring the resources inline with the values expected by the template and will allow CloudFormation to make changes based on the actual values during future operations for this stack.
-
Go to the Simple Queue Service Console.
-
Find the DriftLab-InputQueue, select it, and on Queue Actions, click Configure Queue.
-
Make the following changes to the queue:
- Set Default Visibility Timeout to 30.
- Check Use Redrive Policy, for Dead Letter Queue specify DriftLab-ErrorQueue, and for Maximum Receives enter 5.
- Click Save Changes.
-
Go to the CloudFormation Console.
-
Select drift-lab-with-sqs on the CloudFormation Stacks view, click Actions and Detect drift, then click Yes to confirm the drift detection operation.
-
When complete, time the dialog result will show the status as IN_SYNC.
OPTIONAL: Remediating by overwriting property values
Note: applying a stack update operation over resources that are out of sync with their template definition is a RISKY operation. Consider carefully what the differences between the template and the live state of resources represent on each specific scenario and for each specific property. Simulate your exact scenario in a non-production environment. Keep in mind the interaction between resources and the consequences of a stack update rollback (applying the values of the last version of the template). If possible, this operation should be avoided.
-
Go to the Simple Queue Service Console.
-
Find the DriftLab-InputQueue, select it, and on Queue Actions, click Configure Queue.
-
Make the following changes to the queue:
- Set Default Visibility Timeout to 80.
- Click Save Changes.
-
Go to the CloudFormation Console.
-
Select drift-lab-with-sqs on the CloudFormation Stacks view, click Actions and Detect drift, then click Yes to confirm the drift detection operation.
-
When complete, the dialog result will show the status as DRIFTED.
-
Edit the template file templates\my_cfn_stack.yml
- Set Default Visibility Timeout to 40.
- Save the file.
-
Go to the CloudFormation Console.
-
Select drift-lab-with-sqs on the CloudFormation Stacks view, click Actions and Update Stack.
-
Select Upload a template to Amazon S3 and upload your locally edited template my_cfn_stack.yml
-
Click Next on the Select Template screen, then click Next on the next two pages, and finally click Update on the review page.
-
After the stack is in UPDATE_COMPLETE state, select drift-lab-with-sqs on the CloudFormation Stacks view, click Actions and Detect drift, then click Yes to confirm the drift detection operation.
-
When complete, the dialog result will show the status as IN_SYNC.
End of Lab Exercises
Thank you for using this lab.