Change Manager
This section is currently a work-in-progress.
Systems Manager Change Manager is an enterprise change management framework for requesting, approving, implementing, and reporting on operational changes to your application configuration and infrastructure. From a single delegated administrator account, if you use AWS Organizations, you can manage changes across multiple AWS accounts and across AWS Regions. Alternatively, using a local account, you can manage changes for a single AWS account. Use Change Manager for managing changes to both AWS resources and on-premises resources.
With Change Manager, you can use pre-approved change templates to help automate change processes for your resources and help avoid unintentional results when making operational changes. Each change template specifies the following:
-
One or more Automation runbooks for a user to choose from when creating a change request. The changes that are made to your resources are defined in Automation runbooks. You can include custom runbooks or AWS managed runbooks in the change templates you create. When a user creates a change request, they can choose which one of the available runbooks to include in the request. Additionally, you can create change templates that let the user making the request specify any runbook in the change request.
-
The users in the account who must review change requests that were made using that change template.
-
The Amazon Simple Notification Service (Amazon SNS) topic that is used to notify assigned approvers that a change request is ready for review.
-
The Amazon CloudWatch alarm that is used to monitor the runbook workflow.
-
The Amazon SNS topic that is used to send notifications about status changes for change requests that are created using the change template.
-
The tags to apply to the change template for use in categorizing and filtering your change templates.
In this lab, you will:
- Set up Change Manager
- Configure Change Manager options and best practices
- Create and approve a change template
- Create and approve a change request
- Review the details of the approved change request
Pre-Requisites
You must complete the following capability lab sections before proceeding with Change Manager:
If you have not completed these sections, go back and complete the sections listed above before proceeding.
Set up Change Manager
-
Open the AWS Systems Manager console at https://console.aws.amazon.com/systems-manager/
-
In the navigation pane, choose Quick Setup
-
Select Get started
-
Select Create
-
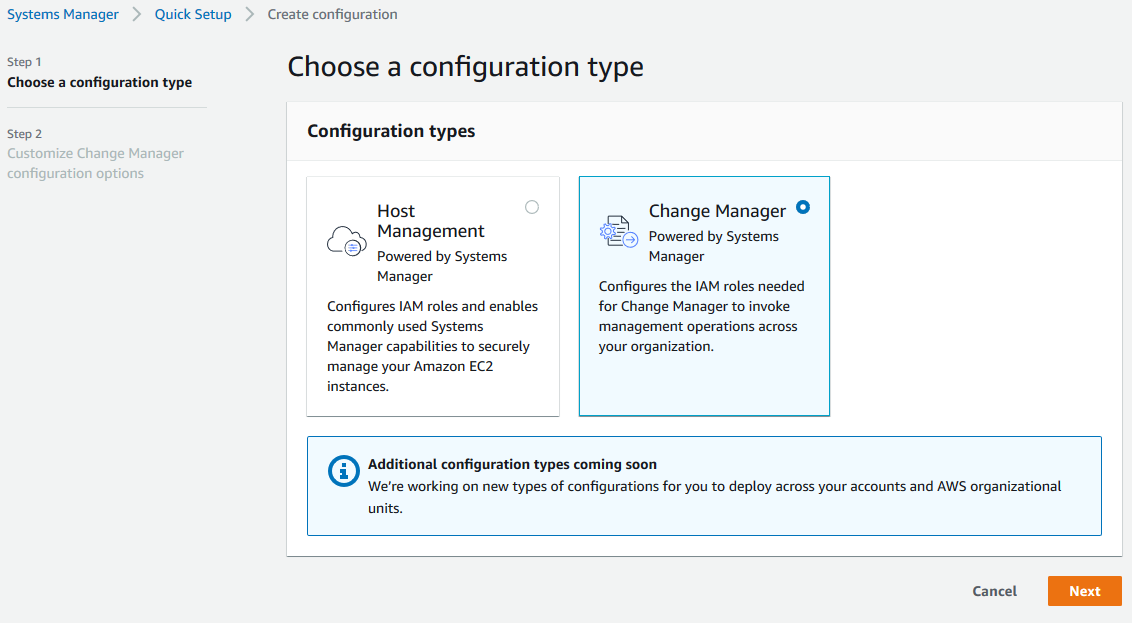
On the Chose a configuration type screen, choose Change Manager, and then choose Next
-
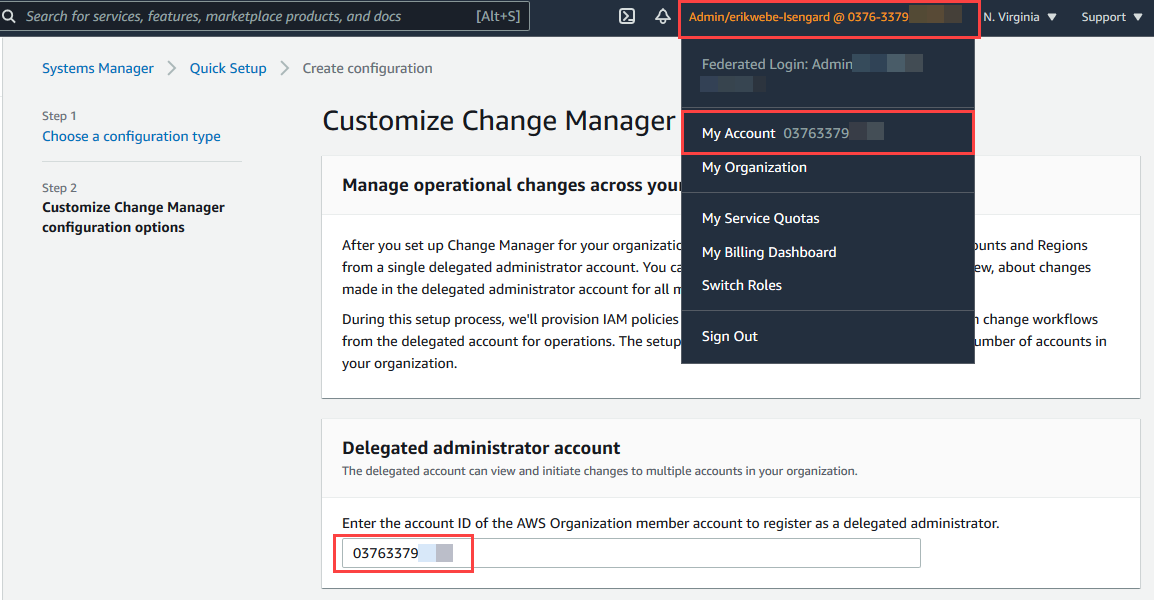
For Delegated administrator account, enter the account ID of the AWS account you are logged in with. To see your account ID, select the drop-down for your role in the upper-right corner
-
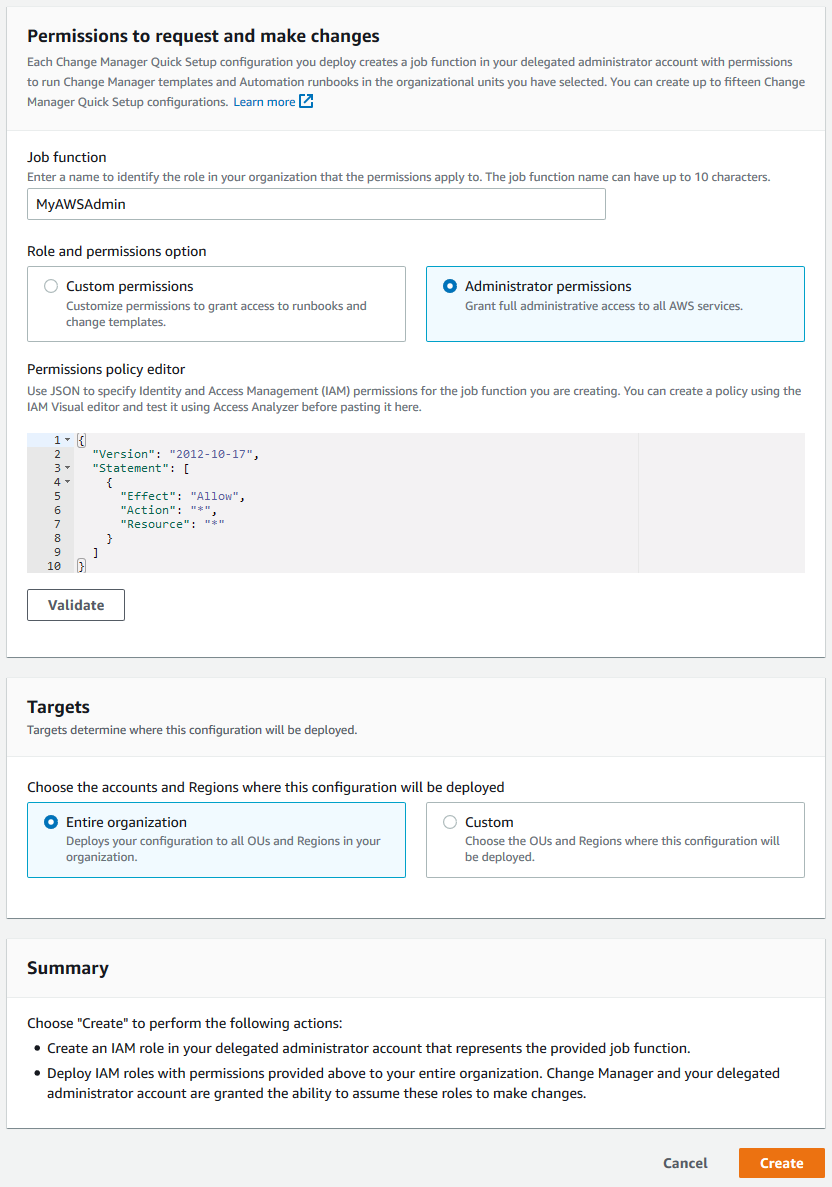
In the Permissions to request and make changes section, do the following:
- For Job function, enter
MyAWSAdmin - For Role and permissions option, choose Administrator permissions
- For Targets, choose Entire organization
- Choose Create
- For Job function, enter
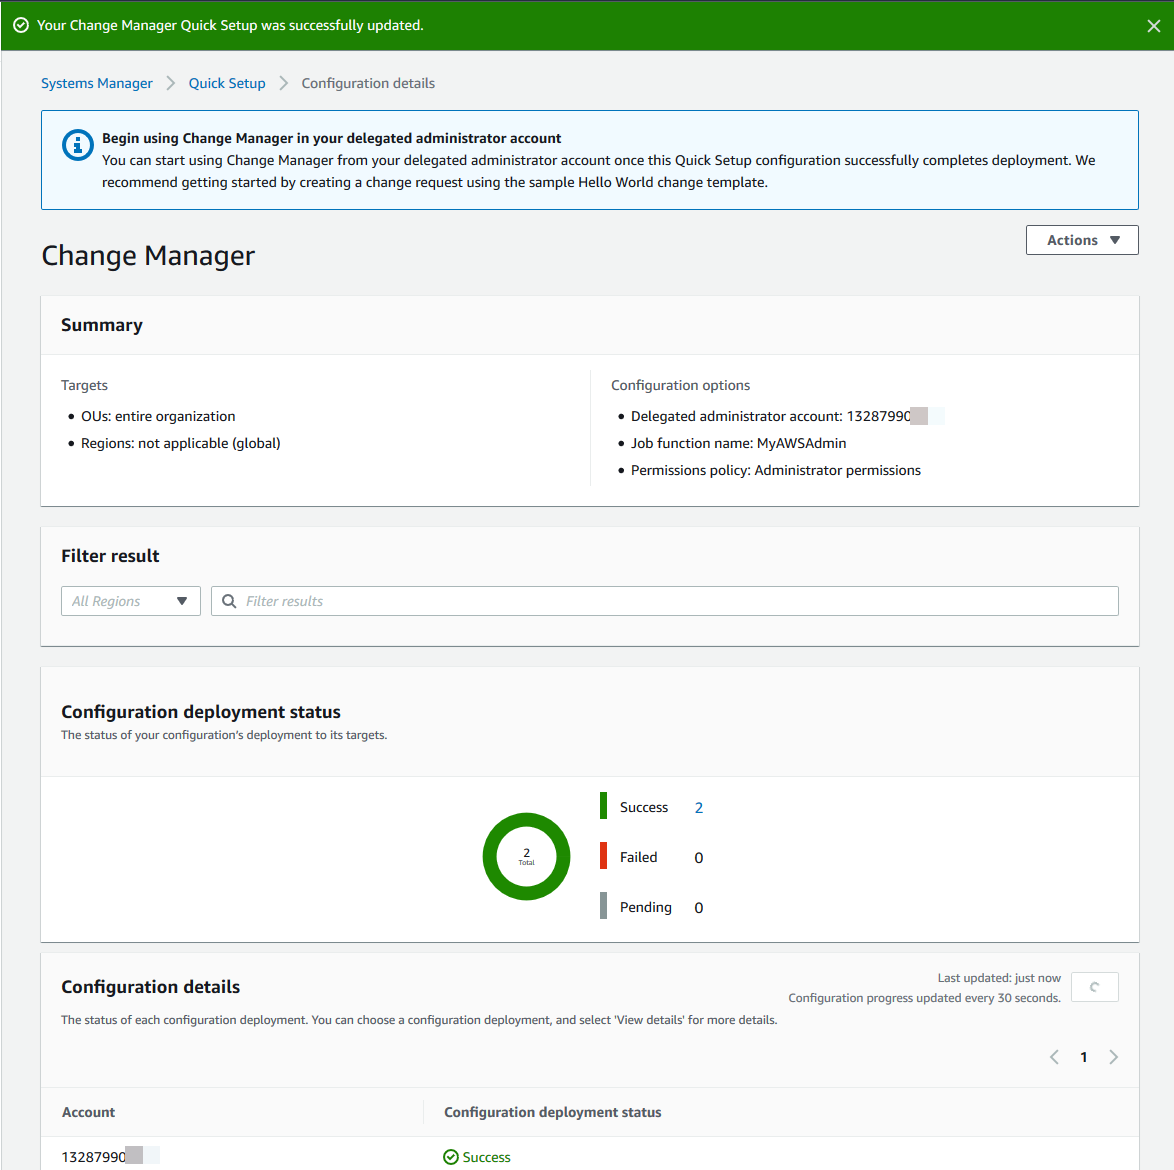
After the system finishes setting up Change Manager for your organization, it displays a summary of your deployments. This summary information includes the name of the permissions policy that was created for the job function you configured. For example, AWS-QuickSetup-SSMChangeMgr-MyAWSAdmin. In a real environment, you would want to make a note of this policy name and attach it to the IAM user or groups who will perform this job function.
Additionally, you may want to create a non-administrative role for Change Manager. For example, you might begin with policy content that provides permissions for working with the Systems Manager documents the job function needs access to. Here is sample policy content that grants access to all the AWS managed Automation documents related to DynamoDB databases and two change templates that have been created in the sample account 123456789012. This example is not comprehensive. Additional permissions may be needed for working with other AWS resources, such as databases and instances.
{
    "Version": "2012-10-17",
    "Statement": [
        {
            "Effect": "Allow",
            "Action": [
                "ssm:ListDocumentVersions",
                "ssm:DescribeDocument",
                "ssm:UpdateDocumentDefaultVersion",
                "ssm:ModifyDocumentPermission",
                "ssm:DescribeDocumentParameters",
                "ssm:GetDocument",
                "ssm:DescribeDocumentPermission",
                "ssm:UpdateDocument",
                "ssm:CreateDocument"
            ],
            "Resource": [
                "arn:aws:ssm:us-east-2:123456789012:document/AWS-CreateDynamoDbBackup",
                "arn:aws:ssm:us-east-2:123456789012:document/AWS-AWS-DeleteDynamoDbBackup",
                "arn:aws:ssm:us-east-2:123456789012:document/AWS-DeleteDynamoDbTableBackups",
                "arn:aws:ssm:us-east-2:123456789012:document/AWS-AWSConfigRemediation-DeleteDynamoDbTable",
                "arn:aws:ssm:us-east-2:123456789012:document/AWS-AWSConfigRemediation-EnableEncryptionOnDynamoDbTable",
                "arn:aws:ssm:us-east-2:123456789012:document/AWS-AWSConfigRemediation-EnablePITRForDynamoDbTable",
                "arn:aws:ssm:us-east-2:123456789012:document/MyFirstDBChangeTemplate",
                "arn:aws:ssm:us-east-2:123456789012:document/MySecondDBChangeTemplate"
            ]
        },
        {
            "Effect": "Allow",
            "Action": "ssm:ListDocuments",
            "Resource": "*"
        }
    ]
}
Configure Change Manager options and best practices
Task 1: Create IAM user for template reviews and change request approval
First, we must create an Identity and Access Management (IAM) user that will act as our change template reviewer and change request approver.
-
Open the AWS IAM console at https://console.aws.amazon.com/iam/
-
In the navigation pane, choose Users
-
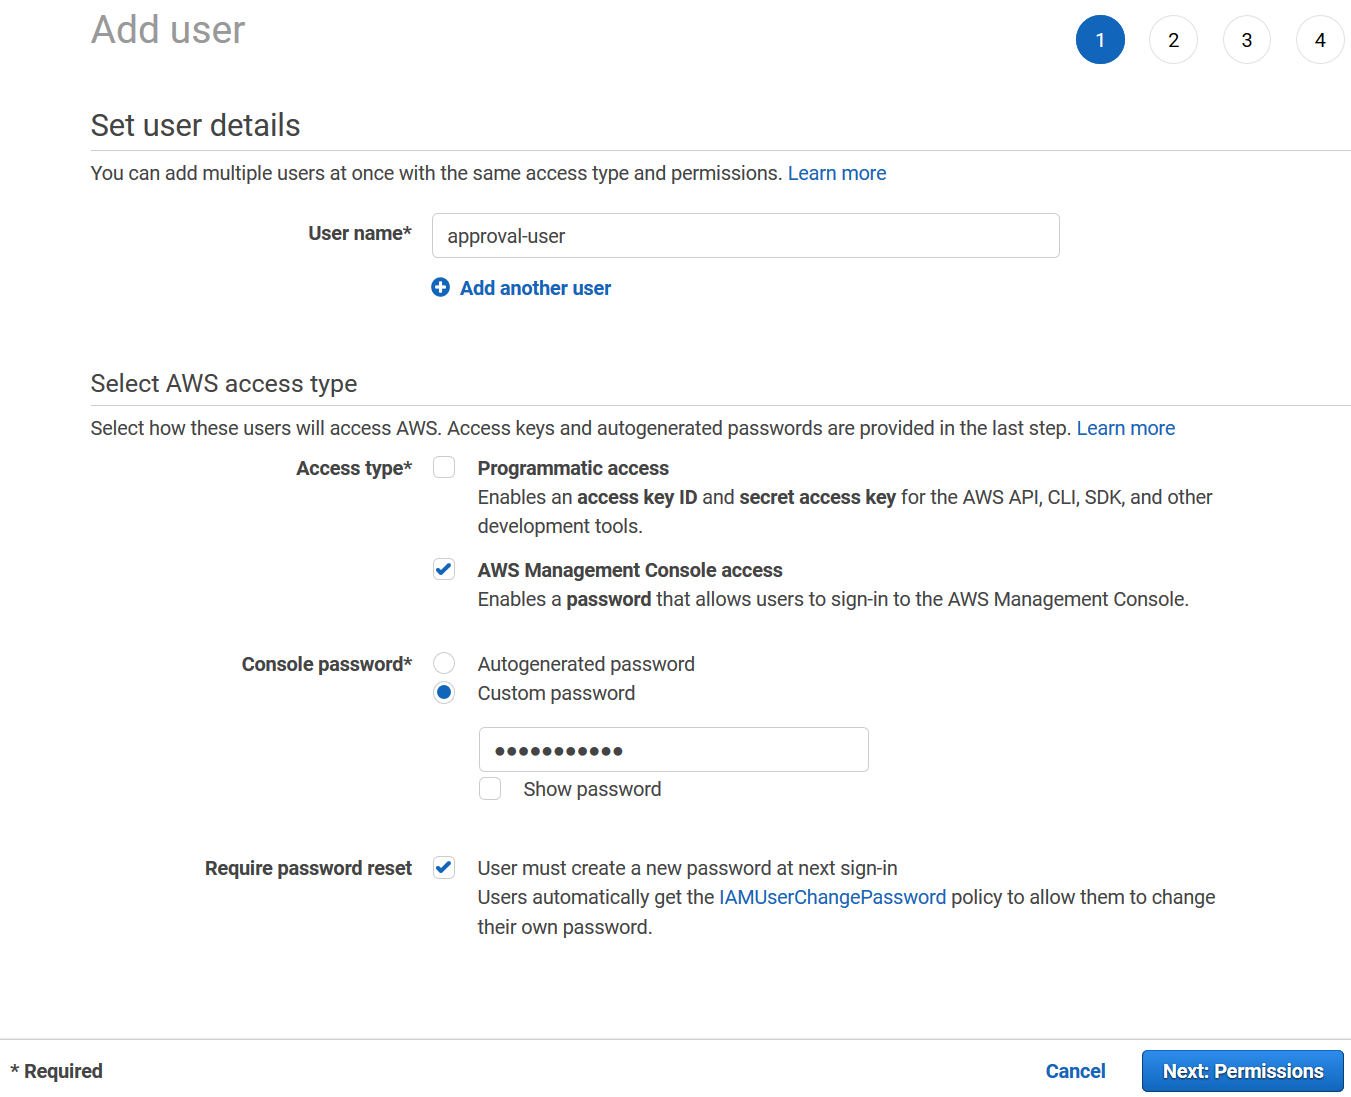
Choose Add user
-
In the Set user details section, enter
approval-user -
In the Select AWS access type section, choose AWS Management Console access
-
For Console password, choose Custom password and enter a password
-
For Require password reset, unselect User must create a new password at next sign-in and choose Next: Permissions
-
In the Set permissions section, choose Attach existing policies directly
-
In the search bar, enter
AdministratorAccess, select AdministratorAccess from the results list, and choose Next: Tags -
Skip adding tags and select Next: Review
-
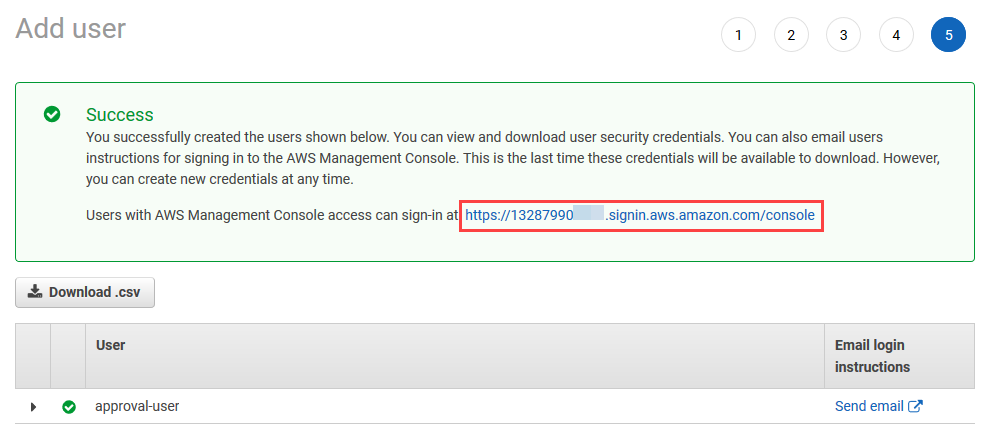
Choose Create user
-
On the resulting screen, copy the AWS Management console sign-in URL to Notepad for use later in the lab
Task 2: Create an IAM service role for Automation
Next we must create an IAM service role, or assume role, that allows the service to perform actions on your behalf during the change operation.
- Open the AWS IAM console at https://console.aws.amazon.com/iam/
- In the navigation pane, choose Roles
- Choose Create role
- For Select type of trusted entity, leave the default value AWS service
- For Choose a use case, select Systems Manager in the section Or select a service to view its use cases
- For Select your use case, choose Systems Manager and choose Next: Permissions
- For Attach permissions policies, enter
AmazonSSMAutomationRolein the search field, choose AmazonSSMAutomationRole, and choose Next: Tags - Skip adding tags and choose Next: Review
- For Role name, enter
change-manager-automation-role, and choose Create role
Task 3: Configuring Change Manager user identity management and template reviewers
Perform the task in this procedure the first time you access Change Manager. You can update these configuration settings later by returning to Change Manager and choosing Edit on the Settings tab.
-
Open the AWS Systems Manager console at https://console.aws.amazon.com/systems-manager/
-
In the navigation pane, choose Change Manager.
-
On the service home page, choose Set up delegated account
-
For User identity management, choose **AWS Identity and Access Management (IAM)
-
For Template reviewer notification, choose Create an Amazon SNS topic, enter
sm-workshop-snsfor the topic name, and choose Add notification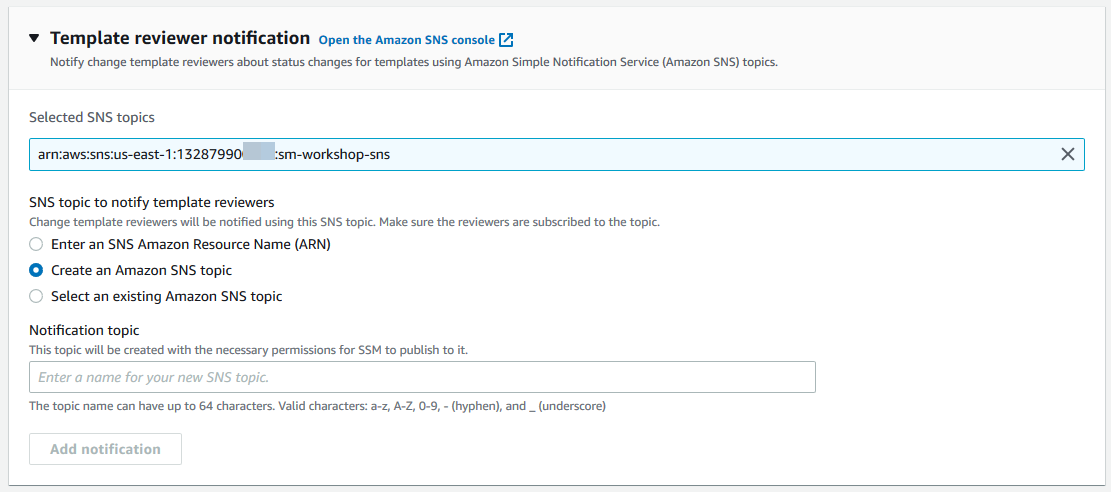
-
For Template reviewers select Add, choose the approval-user we created previously, and select Add approvers
Task 4: Configuring Change Manager change freeze event approvers and best practices
-
For Approvers for change freeze events select Add, choose the approval-user we created previously, and choose Add approvers
-
In the Best practices section, do the following:
- For Check Change Calendar for restricted change events, choose Enabled
- For SNS topic for approvers for closed events, select Create an Amazon SNS topic, enter
sm-workshop-sns, and choose Add notification - Leave Require monitors for all templates as the default non-enabled state. Note In a real world environment, you can ensure that all templates for your organization specify an Amazon CloudWatch alarm to monitor your change operation
- For Require template review and approval before, choose Enabled
-
Choose Submit
Create and approve a change template
Create the change template
- Open the AWS Systems Manager console at https://console.aws.amazon.com/systems-manager/
- In the navigation pane, choose Change Manager
- Choose Create template
- For Name, enter
RestartEC2InstanceTemplate - For Description, optionally enter a description such as,
This is an example template to restart an EC2 instance - For Change template type, leave the default option as Standard change template
- For Runbook options, leave the default option as Select a singel runbook
- For Runbook, select
AWS-RestartEC2Instancefrom the drop-down menu - Leave the default content for Template information
- For Change request approvals, select Add approvers under First-level approvals, and select Request specified approvers
- For Amazon SNS topic for approval notifications, leave the default Select an existing Amazon SNS topic, select
sm-workshop-snsfrom the drop-down menu, and choose Add notification - Skip the Monitoring section
- For Notifications, leave the default Select an existing Amazon SNS topic, select
sm-workshop-snsfrom the drop-down menu, and choose Add notification - Select Save and preview
- Select Submit for review
Approve the change template
-
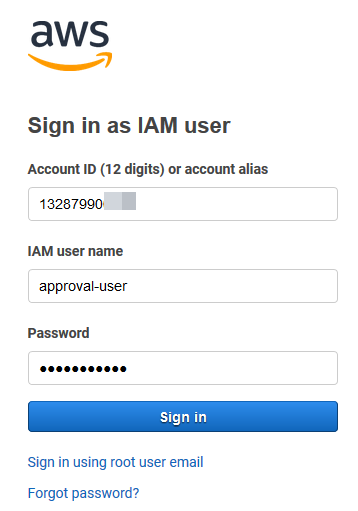
Open a new browser and use the AWS Management console sign-in URL noted above in the Task 1: Create IAM user for template reviews and change request approval section
-
For IAM user name, enter
approval-user -
For Password, enter the password you created previously and choose Sign in
-
Navigate to the AWS Systems Manager Change Manager console
-
Select the Templates tab, and open the RestartEC2InstanceTemplate template
-
Navigate between the various tabs to see the template details, tasks, change requests associated, and version history of the template
-
Once complete, choose Approve
-
Optionally enter any comments and choose Approve
Create and approve a change request
Create the change request
-
Open the AWS management console using the Event Engine link
-
Once signed in, navigate to the AWS Systems Manager Change Manager console
-
Choose Create request
-
For Select change template, choose
RestartEC2InstanceTemplateand choose Next -
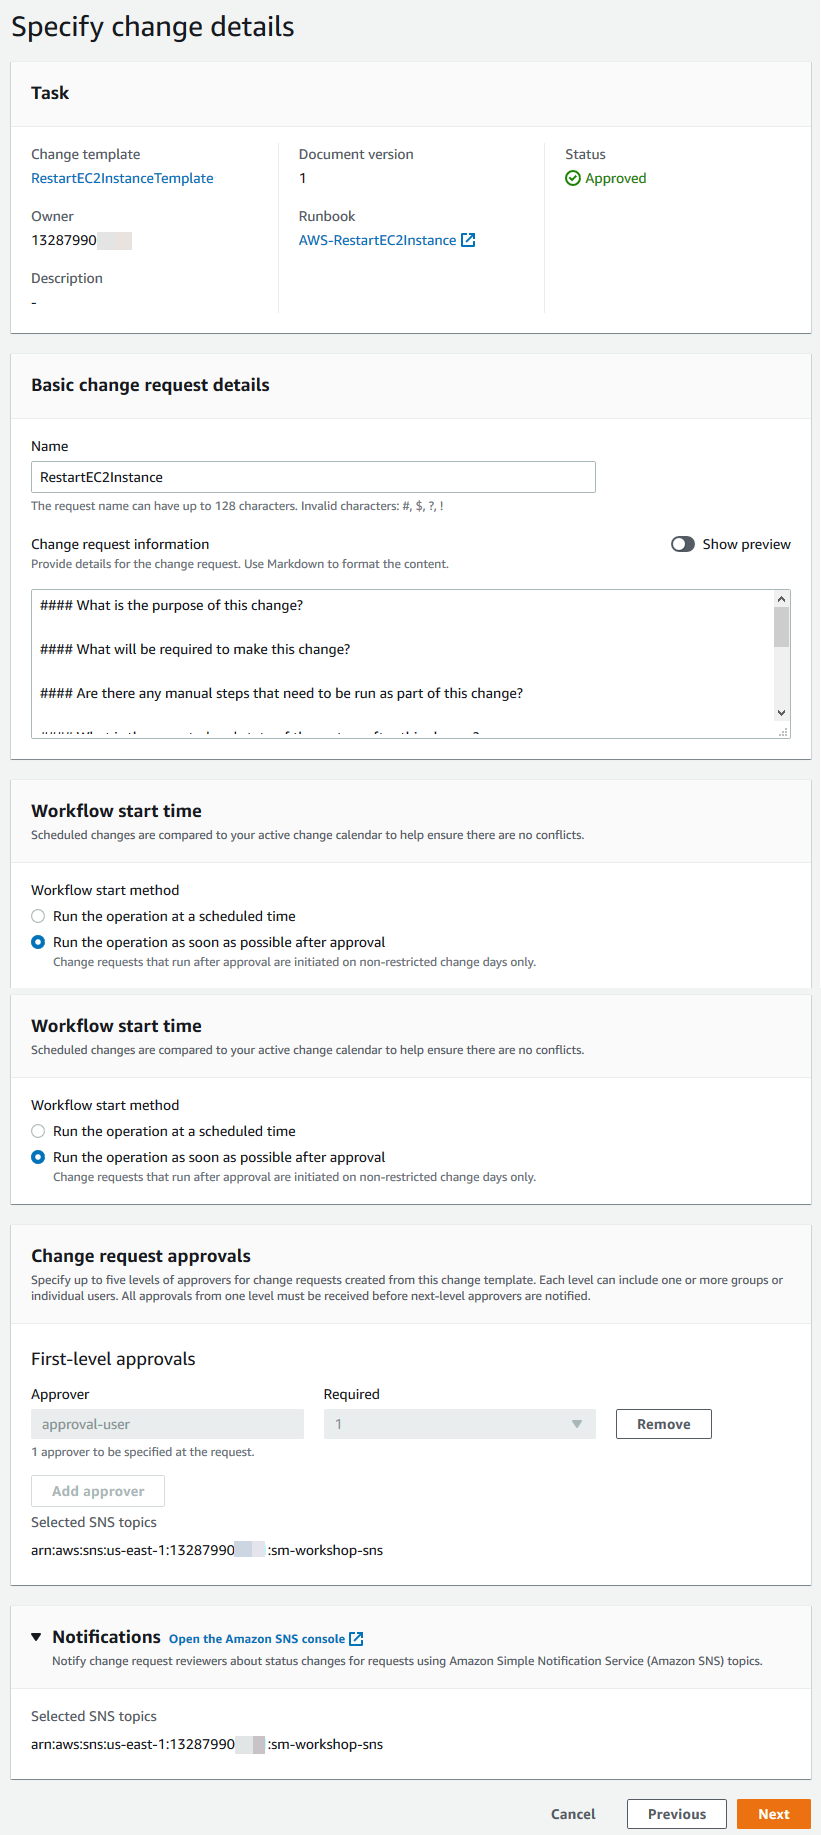
For Name, enter
RestartEC2Instance -
Optionally fill out the Change request information section
-
For Workflow start time, leave the default Run the operation as soon as possible after approval
-
For Change request approvals, choose Add approver, select approval-user, and choose Add approvers
-
Choose Next
-
For Automation assume role, choose the change-manager-automation-role created previously
-
For Deployment location, leave the default value as Apply change to this account
-
For Deployment targets, perform the following steps:
- For Target resources, choose Multiple resources
- For Parameter, chose InstanceId
- For Specify resources, choose Choose a resource group
- Choose Web from the search field
-
Choose Next

-
On the Review and submit page, review the change request details and choose Submit for approval
Approve the change request
-
Open a new browser and use the AWS Management console sign-in URL noted above in the Task 1: Create IAM user for template reviews and change request approval section
-
For IAM user name, enter
approval-user -
For Password, enter the password you created previously and choose Sign in
-
Navigate to the AWS Systems Manager Change Manager console
-
Select the Requests tab, select the RestartEC2Instance change request and choose View details
-
Navigate between the various tabs to see the request details and tasks for the submitted change request
-
Choose Approve, optionally enter any comments, and choose Approve
Review the details of the approved change request
-
Open the AWS management console using the Event Engine link
-
Once signed in, navigate to the AWS Systems Manager Change Manager console
-
Select the Requests tab, select the RestartEC2Instance change request and choose View details
-
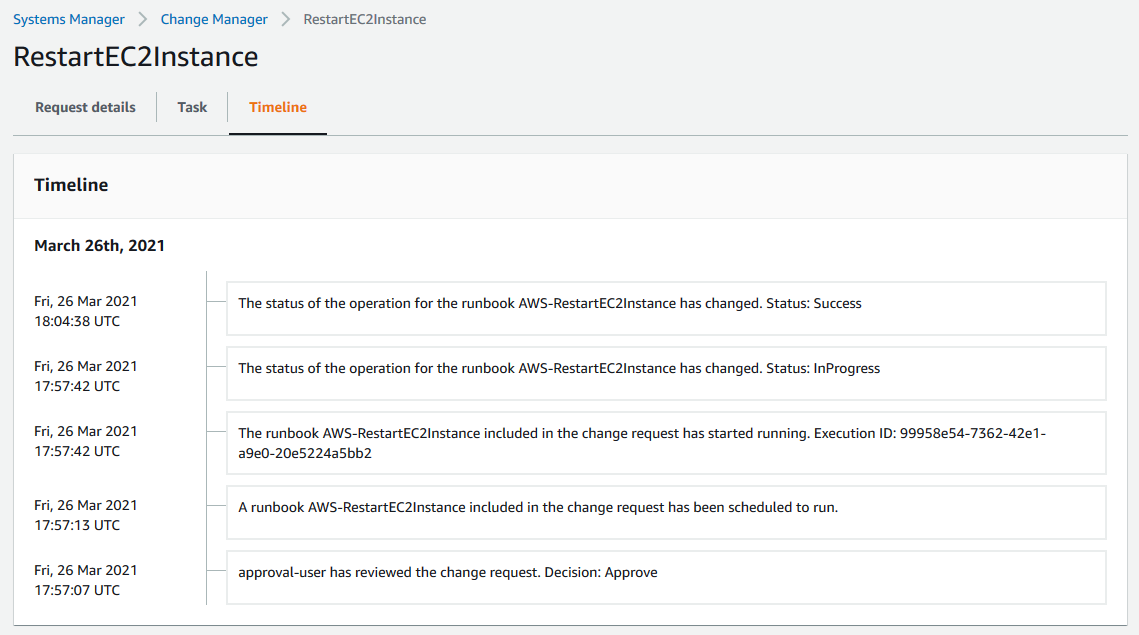
Select the Timeline tab, to see the timeline for the change request process
-
On the Timeline page, note the Execution ID
-
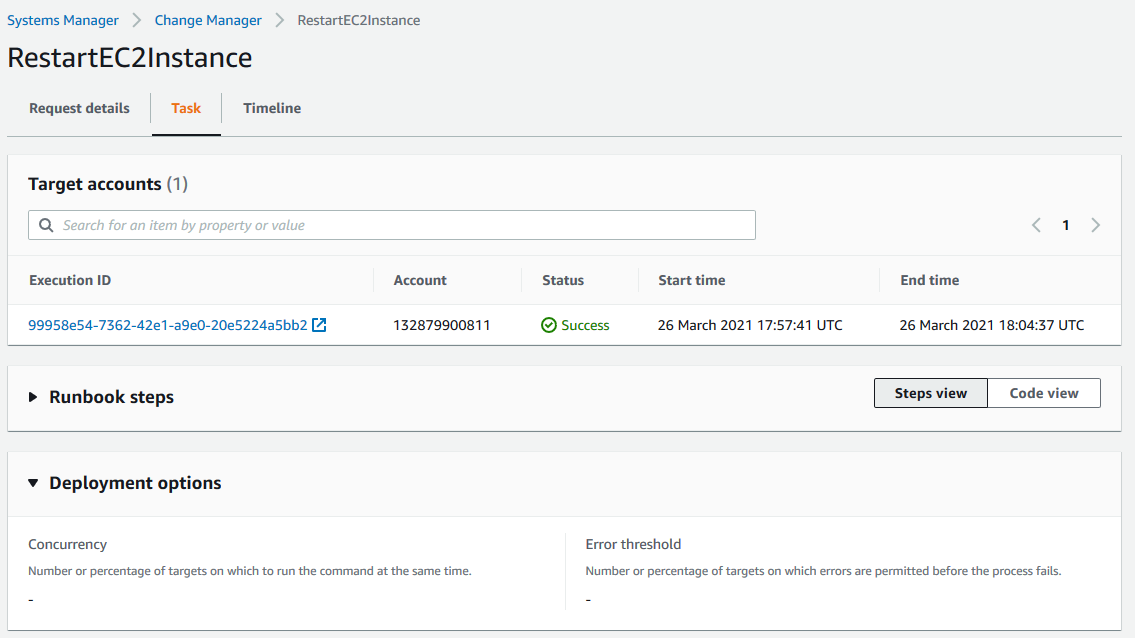
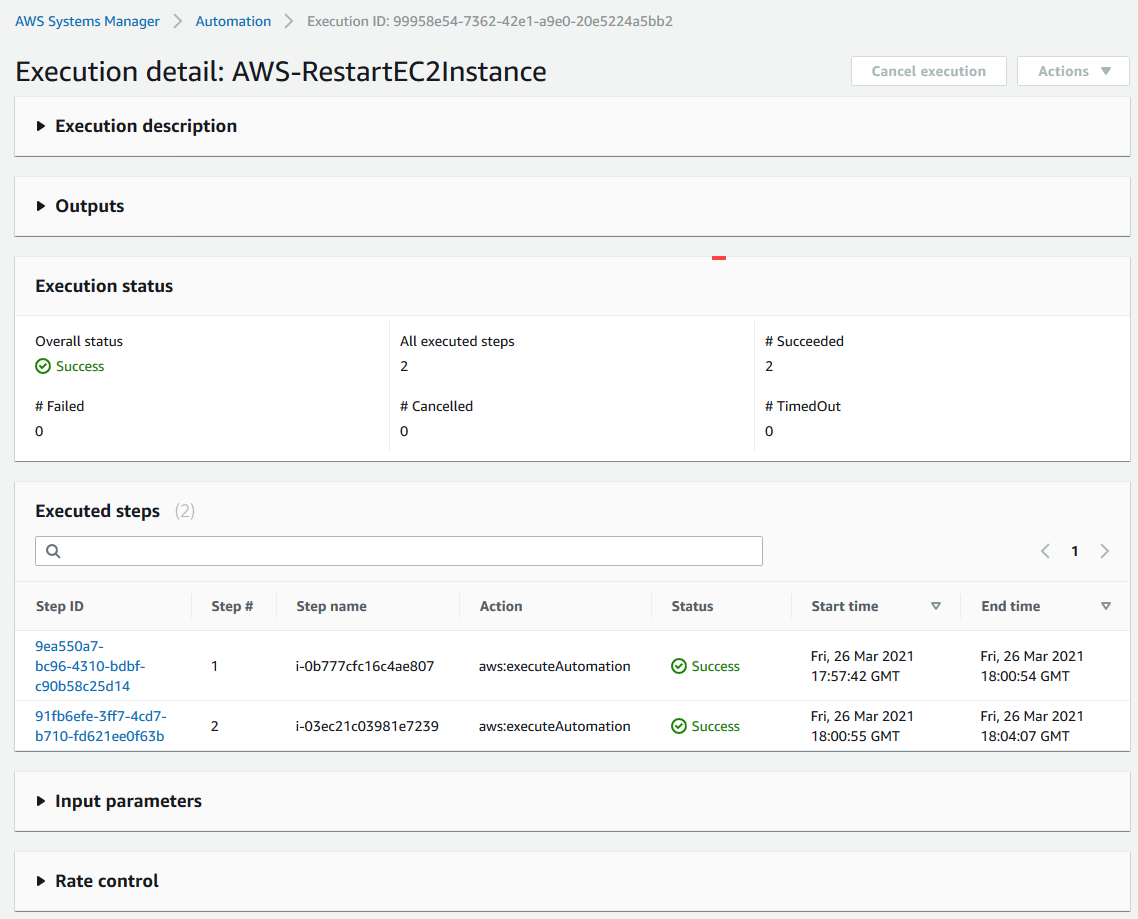
Select the Task tab and select the Execution ID to review the steps of the Automation workflow
-
Review the status and details of each step performed.
For more information on Change Manager, see AWS Systems Manager Change Manager.